

As the coronavirus pandemic continues to impact our daily lives, many of us have found ourselves working from home and realizing that our current video conferencing setups are not up to snuff for what will be needed in the coming weeks.
Whether it’s your daily meetings with staff, a webinar with clients, or if you’re booked for a remote TV appearance, there’s no better time than now to upgrade your setup and put your best face forward. So we’ve put together a guide to the best setups for remote video streaming.
There are three main areas you’ll want to focus on when upgrading your remote working video setup: camera, microphone and lighting. We’ll cover best practices for each of them here, and I’ll provide a few Adweek-approved recommendations at different price points so you can determine what works best for you.
Camera
While most of us have a webcam built into our laptop or desktop computers, they’re often not great quality, and in the case of laptops, they’re positioned at unflattering angles. This is why I highly recommend upgrading to a higher quality external USB webcam that will not only offer a better image, but can be placed in the best possible position for your setup.
There are a few main things to consider here. For the best quality, you’ll want a camera that’s capable of 1080p video at minimum 30fps. If you’re going to be flying solo onscreen, you’ll also want a camera whose field of view is not too wide—about 80 degrees is a safe guideline.
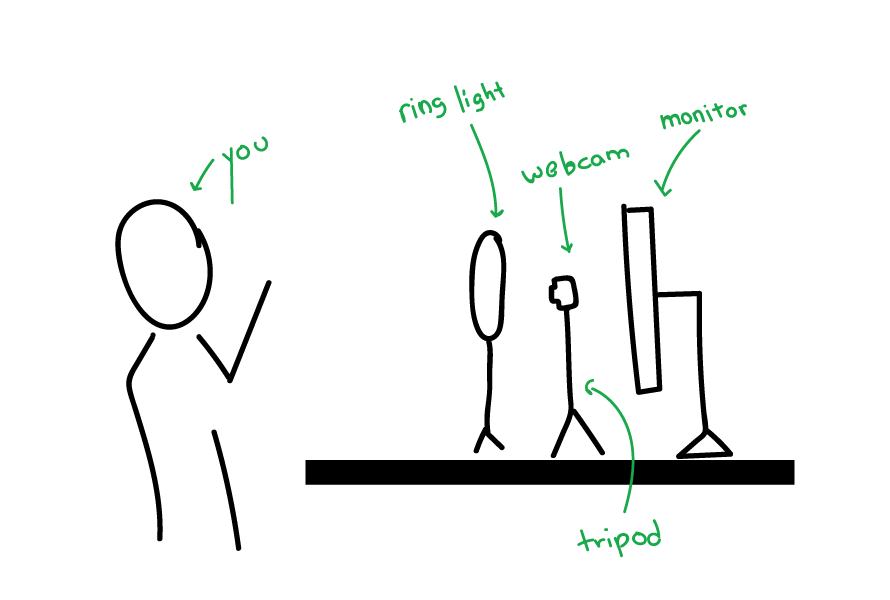
When it comes to positioning the camera, it’s ideal to place it between yourself and your screen so that when you’re looking at the screen, you’re also looking at the camera. I would recommend a basic desktop tripod to accomplish this. Ideally, if you’re using a desktop monitor, the camera will be at or around eye level, which will be the most flattering angle. Alternatively, you can use the built-in clip to attach the webcam to the top of your monitor.

A few more notes on video. Leave a couple feet between yourself and the camera and sit in the center of the frame, leaving a small bit of headroom between the top of your head and the top of the frame. Be cognizant of your background. When possible, try to make your background interesting and have some depth behind you to prevent the image from looking too “flat.” However, if you can’t find the appropriate space, a blank wall is a decent backup option.

Here are our recommendations for the best webcams at three different price points:
- Razer Kiyo Webcam with Built-In Light: $87 (if budget permits, I recommend purchasing separate lights. However, this budget-friendly option kills two birds with one stone.)
- Logitech C920S Pro: $70
- Logitech C922: $100
Lighting
Lighting is arguably the most important part of your entire setup. Even with your fancy new webcam, poor lighting can set you back to square one. There are a few important principles to focus on when it comes to lighting.
First, minimize or eliminate all overhead lighting in your room. Overhead lighting tends to cast harsh shadows on the face, which can be hard to overcome even with supplemental lighting. You’ll ideally want a light source directly on your face, coming from somewhere generally in front of you. This can even be as simple as pointing your desk lamp at your face. However, I would recommend investing a little bit of money into a desktop light that is made to serve this purpose.
Over the past few years, ring lights have exploded in popularity and work perfectly for this application. You’ll want one that comes with a stand, and ideally, you should position it so that your webcam is set up directly behind it, shooting through the center of the ring. You’ll want your face to stand out from the rest of the frame, so do what you can to dim the rest of the light in the room (without making it look like you’re working in the dark, of course).
Here are our recommendations at different price points:
- Your desk lamp: $0
- Razer Kiyo Webcam with Built-in Light: $87
- Ring Light: about $30
Microphone
Last, but certainly not least, you’ll want to figure out audio. For starters, it’s best practice to always use headphones to avoid your microphone picking up the audio from your call. These don’t have to be anything fancy at all, whatever you have will do. Some other best practices are to keep background noise to a minimum, make sure you’re in a quiet place, and turn off A/C units, fans or anything else that makes significant noise.
At the base end, most headphones have a built-in microphone, which can be a great budget-friendly option if you’re already using headphones. However, for a little bit of money, you can get a lot more. For the purpose of videoconferencing, a basic desktop USB mic should be plenty to do the job. You’ll want something with a stand so you can place the mic as close to you as possible (6-14 inches is ideal), without it being in the camera’s frame, and with the front of the mic pointing towards your mouth. This should help to minimize any reverb your room might have.

Here are our recommendations at different price points:
- Your headphones with built-in mic: $0
- AmazonBasics Desktop Mini Condenser Microphone With Tripod: $45
- Blue Snowball Ice: $60

Final thoughts
Feel free to use as much or as little of the advice from this guide as you need, and to mix and match the products to find what fits your budget best. A lot can be had for not much money, and you might even be able to work with what you already own.


